How to Setup Google Maps JavaScript API

📝 Sharing my journey as an aspiring web developer and documenting for my future self
🌱 Currently learning JavaScript
Google Maps JavaScript API gets detailed information about 100 million places that are updated by owner-verified listings and user-moderated contributions.
Since I am building a client-side application, I will be specifically using Google Maps JavaScript API.
ℹ️ Note: Enabling Places API also enables the Places Library, Maps JavaScript API, Places SDK for Android and Places SDK for iOS
Steps For Setting Up
First thing you should know before using Google Maps Platform is that you need to sign up for Google Cloud Platform account. To do that, you need to have a Google account and a credit card.
Create a billing account
Create a project
Enable APIs
Restrict API Key
Step 1: Create a Billing Account
This is used to track costs associated with your project. When you first create a billing account, you get $300 Google Cloud credits as free trial for 90 days to explore Google Cloud and Google Map Platform products and services.
For this project, I only used free services available from Google Maps API to avoid being charged. Full Google Maps Platform pricing
Step 2: Create a Project
You must have a project to start using Google Maps Platform. It forms the basis for managing services, credentials, billing, APIs and SDKs. This will created for you during the sign up process. This starter checklist is a good place to help with the initial setup.
Step 3: Enable APIs
You can browse the full Google Maps API library to decide which API best suits your needs.
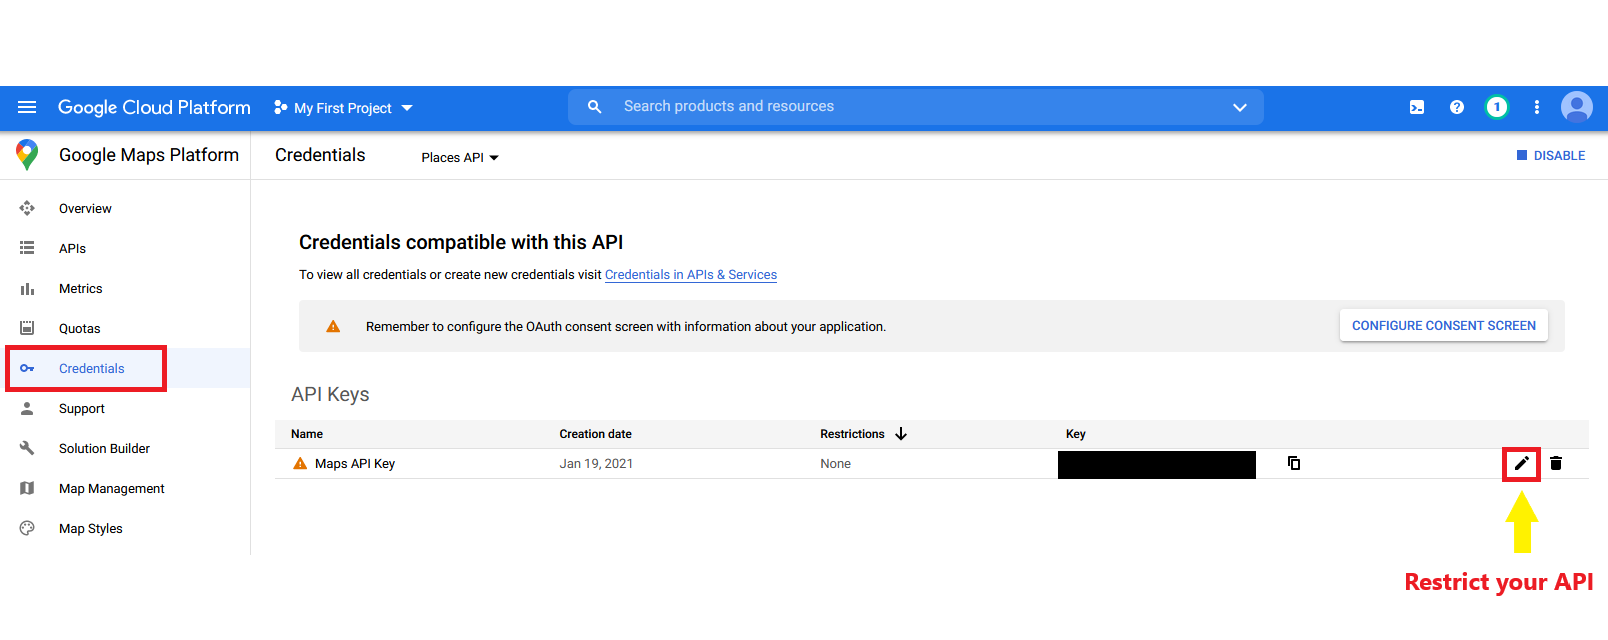
Step 4: Restrict API Key
This is to prevent your account from unwanted and malicious usage. Once API key has been restricted, you'll be able to block anonymous unwanted traffic, control the number of calls to your API and identify usage patterns in your API's traffic.
There are two ways to secure your key:
Application restriction - Restrict usage of your key to a specific application (IP address, referrer URLs, Android app, iOS app), or
API restriction - Restrict usage of your key to one or more specific APIs.
I will be restricting my key based on referrer URL and restrict only to use Places API.
Application Restrictions
Use HTTP referrer to restrict the URL that is hosting your website and localhost. The HTTP referrer is a HTTP header that identifies the address of the previous webpage, this allows the new webpage to see where the request originated.
Why restrict by HTTP referrer? I like the analogy made from this answer on Information Security Stack Exchange:
A lock on your luggage may stop a casual thief from opening your bag to grab something, but it won't stop someone stealing your bag. But the cost is low, so it is a still a useful security control.
So, just because a malicious agent could copy the referrer header, they may not have the time or inclination to do so. Think of a valid referrer header like a concert wristband. Can you forge them, or sneak around the guard checking wristbands? Sure you can, but it doesn't make the band useless.
It raises the cost for the attacker.
API Restrictions
Go to Credentials on the left navigation bar in Google Cloud Platform.
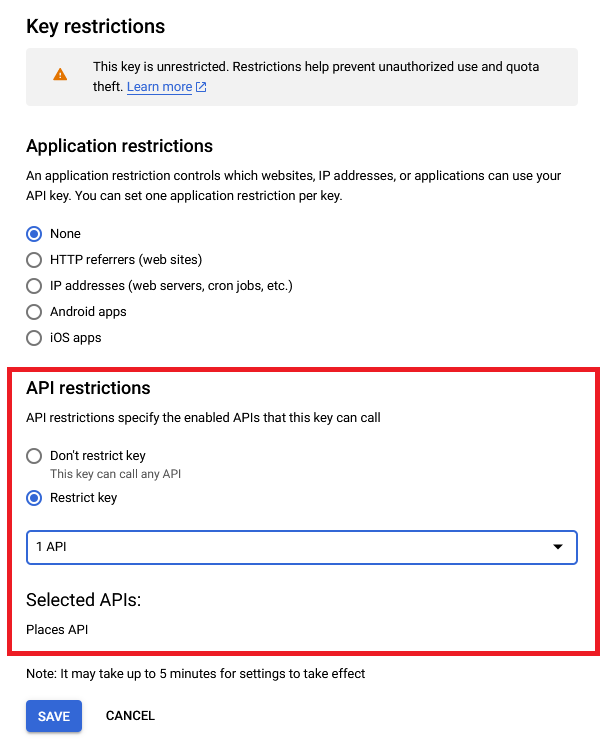
Set restriction usage only to Places API.
Best Practices for Securing API Key
From Google's documentation:
Do not embed API keys directly in code. API keys that are embedded in code can be accidentally exposed to the public. Instead of embedding your API keys in your applications, store them in environment variables or in files outside of your application's source tree.
Do not store API keys in files inside your application's source tree. If you store API keys in files, keep the files outside your application's source tree to help ensure your keys do not end up in your source code control system. This is particularly important if you use GitHub.
Set up application and API key restrictions. By adding restrictions, you can reduce the impact of a compromised API key.
Delete unneeded API keys to minimize exposure to attacks.
Regenerate your API keys periodically. You can regenerate API keys from the Credentials page by clicking Regenerate key for each key. Then, update your applications to use the newly-generated keys. Your old keys will continue to work for 24 hours after you generate replacement keys.
Review your code before publicly releasing it. Ensure that your code does not contain API keys or any other private information before you make your code publicly available.
Creating Environment Variables to Store API Key
I used dotenv to store api key in .env file and then included it in my .gitignore file, so that git will know to ignore that file when I push to GitHub.
1) Install dotenv
npm install dotenv
2) As early as possible, require and configure dotenv in your app:
require('dotenv').config()
3) Create .env file in root directory and add environment-specific variables on new lines in NAME=VALUE pairs:
For example:
API_KEY=1234567890
4) Create .gitignore file and include .env file inside
Making Find Place Requests
This request takes a string input and returns a place. I didn't use Nearby Search/ Text Search requests since they're not part of Google Console's free tier.
Illustration by Murat Kalkavan from Icons8
See Also
- https://developers.google.com/maps/gmp-get-started
- https://developers.google.com/places/web-service/get-api-key
- https://cloud.google.com/docs/authentication/api-keys?hl=en
- https://developers.google.com/places/web-service/overview
- https://12factor.net/config
- https://levelup.gitconnected.com/an-introduction-to-environment-variables-and-how-to-use-them-c72e8653c0ee
- https://medium.com/swlh/how-to-implement-google-places-api-in-your-application-js-express-node-js-97b16da24835
- https://medium.com/the-node-js-collection/making-your-node-js-work-everywhere-with-environment-variables-2da8cdf6e786
- https://medium.com/swlh/google-maps-places-api-28b8fdf28082
- https://softauthor.com/google-maps-places-api-javascript/


